DaVinci ResolveのLuaスクリプト入門

DaVinci Resolve は動画編集ソフトです. 無料版でも十分な機能があり、とくに Fusion でいろいろなエフェクトや調整ができるので使っています. ここでは、標準で使用できるLuaスクリプトを使ってツールを作ってみます.また、Luaについても少し解説します.
はじめに
DaVinci Resolveのスクリプトは標準で Lua が組み込まれています.Luaはとても簡潔で、実は慣れると、とても書きやすいことがわかります. ただし、Luaそのものは最低限の機能しか実装されておらず、使える機能はアプリ側が用意したライブラリに依存します.
ちなみに、DaVinci Resolveは Lua だけではなく、Pythonもサポートしています.しかし、標準では利用できず、あとからインストールする必要があります.
公式からインストーラをダウンロードしてインストールしてもいいですし、仮想環境を作成しても問題ありません.ただし、仮想環境の場合、環境変数を設定する必要があります.ResolveDevDoc や、README.txt (たとえば、C:\ProgramData\Blackmagic Design\DaVinci Resolve\Support\Developer\Scripting\README.txt)を参照してください.もちろん、ここでは Python について詳しく触れません.
なお、環境は Windows で、UIは英語表記、バージョンは 19.0 です.DaVinci Resolveを個人で少し使っている程度です.
今回作るツールは2つ.1つはタイムラインを開くツールです.シーンが多くなるとフォルダ構造も階層が深くなったり、なぜかシーンファイルを開くためにダブルクリックしようとするとクリックした直後にしばらく操作できずにいて、その後はシーンの名前変更になってしまったりと若干ストレスを感じていました.私はEdit画面を主に使っているので、Edit画面からタイムラインを切り替えたいです. もう1つはFusionのツールで、特定のノードのインスペクタに表示されるボタンを押すスクリプトです.これは、Trailsノードを使っているときに、RestartやPrerollボタンを押すことがよくあるのですが、複数のTrailsノードがあったりするととても面倒でした.
今回はこの2つを作成します.ここでは、最低限のプログラミングについて知っていることを前提とします(たとえば、変数や関数).
Lua
Luaのマニュアルや日本語版へのリンクを貼っておきます:
また、次の記事もシンプルでわかりやすいです:
Lua 入門
DaVinci Resolve のコンソール画面を使いながら、まずは Lua について解説します.
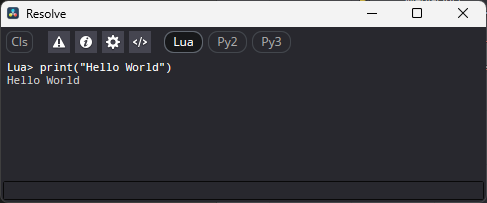
まずは、print関数から.
Lua> print("Hello World!")
DaVinci ResolveのLuaのバージョンを確認します.バージョンは _VERSION に格納されています.
Lua> print(_VERSION)
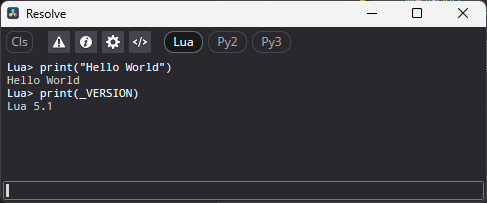
5.1と結構古いです.最新版ではないので注意してください.
以降はコンソール画面のスクリーンショットを省略します.
変数は大域変数とローカル変数があります.ローカルの場合、local を指定します.
Lua> a = 10
Lua> print("a=", a)
a=10
Lua> local b = 20
Lua> print("b=", b)
b=nil
bがnilになっています.nilは初期化されていない、無効な値という意味です.
今はスコープがないので、localで定義できません.
大域変数は「大域環境」または「大域テーブル」に格納されます.それは _G です.
print(_G) としてみると
Lua> print(_G)
table: 0x02549a311d68
これは _G がテーブルで、0x02549a311d68はそのアドレスです.
この中身を詳しく見るには dump関数で見ることができます.
ですが、このテーブルはでかいので、表示するのに時間がかかってしまうし、おそらく画面に収まりません.
このテーブルはキーと値の2つのペアの集まりです.そのキーを表示してみましょう.
そのために、for文と pairs関数を使います.
Lua> for k,v in pairs(_G) do print(k) end
_FusionApp__GetAttr_String
_FusionApp__GetAttr_Ptr
_FusionApp__GetAttr_float64
_FusionApp__GetAttr_uint32
_FusionApp__GetAttr_int32
...
それでも、結構な数があります.ここで v にはキーに対応した値が入っています.
どのような値が入っているかは type 関数でわかります.
string.format 関数も使って整形して表示してみましょう.
Lua> for k,v in pairs(_G) do print(string.format("%s\t%s", k, type(v))) end
_ParticleStyle__GetAttr_ID	function
_ParticleStyle__GetAttr_String	function
_ParticleStyle__GetAttr_Ptr	function
_ParticleStyle__GetAttr_float64	function
_ParticleStyle__GetAttr_uint32	function
...
ここまでくれば、大域環境で定義されている情報が取り出せます.
まずは組み込み関数(builtin)を調べてみると:
assert	function: builtin#2
type	function: builtin#3
pairs	function: builtin#5
ipairs	function: builtin#7
setmetatable	function: builtin#9
getfenv	function: builtin#10
setfenv	function: builtin#11
rawget	function: builtin#12
rawset	function: builtin#13
rawequal	function: builtin#14
rawlen	function: builtin#15
unpack	function: builtin#16
select	function: builtin#17
tonumber	function: builtin#18
tostring	function: builtin#19
error	function: builtin#20
pcall	function: builtin#21
xpcall	function: builtin#22
loadfile	function: builtin#23
load	function: builtin#24
loadstring	function: builtin#25
dofile	function: builtin#26
gcinfo	function: builtin#27
collectgarbage	function: builtin#28
newproxy	function: builtin#29
getmetatable	function: builtin#8
next	function: builtin#4
これは Lua に元からある関数です.
次に大域関数です:
dumptostring	function: 0x00a91f10
splitpath	function: 0x00a91f40
callglob	function: 0x00a91fa0
safegetsymbol	function: 0x00a91fd0
ldofile	function: 0x00a92000
ordered	function: 0x00a81db0
printerr	function: 0x00a92338
tr	function: 0x00a92398
notr	function: 0x00a923c8
istype	function: 0x0280f980
readdir	function: 0x00a863c8
createdir	function: 0x00a86428
removedir	function: 0x00a8c348
pinghosts	function: 0x00a8c538
fileexists	function: 0x00a8c5a0
direxists	function: 0x00a8c608
executebg	function: 0x00a8c670
getcurrentdir	function: 0x00a8c6d8
setcurrentdir	function: 0x00a8c740
getpid	function: 0x00a8c7a8
touserdata	function: 0x00a8c808
wait	function: 0x00a8c870
stripname	function: 0x00a8c998
isvalidname	function: 0x00a8ca00
fullpath	function: 0x00a8ca68
getclipboard	function: 0x00a8cca8
setclipboard	function: 0x00a8cd10
iif	function: 0x00a92d60
do_	function: 0x00a92d90
dostring	function: 0x00a91eb0
match	function: 0x00a91f70
dump	function: 0x00a91ee0
trace	function: 0x00a81f30
exit	function: 0x00a8cc70
module	function: 0x00a85330
require	function: 0x00a85368
print	function: 0x00a9f180
eval	function: 0x02810608
findnest	function: 0x0280f950

Fusion	function: 0x00a81de0
FusionServer	function: 0x00a81e10
Resolve	function: 0x00a81e40
Generation	function: 0x00a81e70
StudioPlayer	function: 0x00a81ea0
ThisApp	function: 0x00a81ed0
Help	function: 0x00a81f00
TableConstructor	function: 0x00a821a0
Action	function: 0x00a821d0
Event	function: 0x00a82240
Target	function: 0x00a822b0
Hotkeys	function: 0x00a82320
Menus	function: 0x00a92108
Sub	function: 0x00a92178
Before	function: 0x00a921e8
After	function: 0x00a92258
Replace	function: 0x00a922c8
BITMASK	function: 0x0280f8f0
StartServer	function: 0x00a8cad0
GetAppName	function: 0x00a8cb38
GetAppUUID	function: 0x00a8cba0
CreateUUID	function: 0x00a8cc08
ToUNC	function: 0x00a8cd78
ScriptApp	function: 0x00a8cdd8
AsyncScriptApp	function: 0x00a8ce40
SendNotify	function: 0x00a8cea8
Using	function: 0x00a8cf10
GetUsing	function: 0x00a8cf70
SetActiveComp	function: 0x00a8cf10
GetActiveComp	function: 0x00a8cf70
FuLimit	function: 0x02810638
FuLimitS	function: 0x02810668
FuFltLimit	function: 0x02810698
FuLimit8	function: 0x028106c8
CallEnv	function: 0x02810730
HexData	function: 0x00a82b58
dump関数はここにあり�ます.これは DaVinci Resolveが用意した関数であることがわかります.
ライブラリなどはテーブルとして確認できます:
io	table: 0x02432400	table: 0x02432400
math	table: 0x02437a30	table: 0x02437a30
debug	table: 0x024389c8	table: 0x024389c8
bit	table: 0x024393c0	table: 0x024393c0
Tags	table: 0x0277c170	table: 0x0277c170
lpeg	table: 0x0243a690	table: 0x0243a690
eyeon	table: 0x0243d518	table: 0x0243d518
class	table: 0x0243e5d8	table: 0x0243e5d8
arg	table: 0x02448470	table: 0x02448470
bmd	table: 0x02432c18	table: 0x02432c18
ffi	table: 0x027fecf0	table: 0x027fecf0
os	table: 0x02436af8	table: 0x02436af8
string	table: 0x02437108	table: 0x02437108
jit	table: 0x02439af8	table: 0x02439af8
table	table: 0x02435400	table: 0x02435400
coroutine	table: 0x02434580	table: 0x02434580
EnumMap	table: 0x0246b4b0	table: 0x0246b4b0
TagMap	table: 0x0246b3a8	table: 0x0246b3a8
package	table: 0x02434a80	table: 0x02434a80
最後にユーザーデータです.ユーザーデータはアプリ側(DaVinci Resolve)が用意したものです.
fusion	FusionUI (0x000001E6236D7040)
fu	FusionUI (0x000001E6236D7040)
res	Resolve (0x00007FF6E55FD7E0)
resolve	Resolve (0x00007FF6E55FD7E0)
app	FusionUI (0x000001E6236D7040)
アドレスが同じものは、指しているデータが同じなのでまったく同じものになります.
ですから、fusionとfu、appはすべて同じだとわかります.resとresolveも同様です.
Luaのテーブルは {} で作成できます.
a = {}
値の追加や設定は a['key'] = value という書き方をします.ここで a はテーブルです.
これは a.key = value とも書くことができます.
Lua> a = {}
Lua> a['name'] = "John"
Lua> a.age = 20
Lua> dump(a)
table: 0x0254c17062c0
	name = John
	age = 20
このdump関数はプロンプトの先頭に==と書いても同じです.
Lua> a = {}
Lua> a['name'] = "John"
Lua> a.age = 20
Lua> ==a
table: 0x0254c17062c0
	name = John
	age = 20
テーブルの初期化時に書くこともできます.その場合は key = valueとします.
Lua> a = { name = "John", age = 20 }
Lua> dump(a)
table: 0x0254c1706a50
	name = John
	age = 20
Luaでは配列もテー�ブルで扱います.
Lua> a = {1, 2, 3, 4}
配列のアクセスは1から始まります.
Lua> a = {1, 2, 3, 4}
Lua> print(a[1])
1
# を変数の前につけることで長さを取得できます.
Lua> a = {1, 2, 3, 4}
Lua> print(#a)
4
配列の各要素にアクセスするにはfor文を使います.
Lua> a = {1, 2, 3, 4}
Lua> for i=1,#a do print(a[i]) end
1
2
3
4
これは ipairs関数を使っても同じことができます.
Lua> a = {1, 2, 3, 4}
Lua> for i,v in ipairs(a) do print(a[i]) end
1
2
3
4
Lua> for i,v in ipairs(a) do print(v) end
1
2
3
4
実は配列にpairs関数を使っても同じ結果になります.
Lua> a = {1, 2, 3, 4}
Lua> for i,v in pairs(a) do print(a[i]) end
1
2
3
4
Lua> for i,v in pairs(a) do print(v) end
1
2
3
4
次に条件分岐ですが、if文を使います.
Lua> a = 2
Lua> b = 5
Lua> if a<b then print("a<b") else print("a>=b") end
a<b

Lua> a = 5
Lua> b = 2
Lua> if a<b then print("a<b") else print("a>=b") end
a>=b
また、DaVinci ResolveのLuaにはiif関数があります.
これは、単純なif文を1行で短く書けます.
Lua> a = 2
Lua> b = 5
Lua> c = iif(a<3, a, b)
Lua> print(c)
2
これは a が3未満の場合にaの値、そうでないならbの値が返ります.
複数の条件を組み合わせるときは and または or を使います.
Lua> a = 10
Lua> if a>5 and a%2==0 then print("OK") else print("NG") end
OK
比較演算子は、==, <, <=, >, >= と一般的なものが使えますが、等しくない場合、~=となりますので注意してください.
次に関数定義です.function と end で囲みます.
Lua> function add(a,b) return a+b end
Lua> print(add(10,20))
30
オブジェクトの関数を呼び出す場合、関数が引数にオブジェクトそのものを受け取るものがあります.この場合、オブジェクトの関数の呼び方は2種類あります.
たとえば、型がhogeのオブジェクトobjの関数fooを呼びたい場合、次のようになります:
Lua> hoge.foo(obj)
Lua> obj:foo()
この2つはどちらも同じです.前者は型を明記する必要があるので、基本的に後者を使います. あとは、コメント機能です.
-- コメント
--[[
  複数行コメント
--]]
複数行コメントは閉じるときに ]] だけでもいいのですが、--]] にすればコメントを開くときの --[[ を ---[[ とするだけで切り替えられて便利です.
--[[
複数行コメント
--]]
---[[
print("この行は有効にな�る")
--]]
最後に、文字列の連結は .. 演算子を使います.
Lua> m = "Hello" .. " World!"
Lua> print(m)
Hello World!
Luaには他にも機能がありますが、とりあえずこれぐらいの知識があれば今回は大丈夫かと思います.
bmdライブラリ
前述したようにLuaは必要最低限の機能しか提供しておらず、DaVinci Resolveがある程度機能を提供してくれないと使い物になりません. bmd(Black Magic Design?)ライブラリはDaVinci Resolveが提供しているライブラリです.このライブラリに含まれているものが大域環境に公開されていたりします.
中身を見てみましょう:
Lua> dump(bmd)
table: 0x02549a312c18
fileexists = function: 0x02549a31c5a0
direxists = function: 0x02549a31c608
executebg = function: 0x02549a31c670
getcurrentdir = function: 0x02549a31c6d8
setcurrentdir = function: 0x02549a31c740
getpid = function: 0x02549a31c7a8
touserdata = function: 0x02549a31c808
wait = function: 0x02549a31c870
getuptime = function: 0x02549a31c8d0
gettime = function: 0x02549a31c938
stripname = function: 0x02549a31c998
isvalidname = function: 0x02549a31ca00
isquotable = function: 0x02549a31ca68
fullpath = function: 0x02549a31cad0
startserver = function: 0x02549a31cb38
getappname = function: 0x02549a31cba0
getappuuid = function: 0x02549a31cc08
createuuid = function: 0x02549a31cc70
getclipboard = function: 0x02549a31cd10
setclipboard = function: 0x02549a31cd78
tounc = function: 0x02549a31cde0
scriptapp = function: 0x02549a31ce40
asyncscriptapp = function: 0x02549a31cea8
sendnotify = function: 0x02549a31cf10
using = function: 0x02549a31cf78
getusing = function: 0x02549a31cfd8
obtaingloballock = function: 0x02549a31d040
exit = function: 0x02549a31ccd8
defragfile = function: 0x02549a31d120
defragsequence = function: 0x02549a31d188
readfile = function: 0x02549a31d1f0
writefile = function: 0x02549a31d258
readstring = function: 0x02549a31d2c0
writestring = function: 0x02549a31d328
openfileexternal = function: 0x02549a31d390
openurl = function: 0x02549a31d400
setapptitle = function: 0x02549a31d460
translate = function: 0x02549a31d4c8
UIDispatcher = function: 0x02549a32f8a8
settrcontext = function: 0x02549a322560
nextstate = function: 0x02549a311f90
getstateindex = function: 0x02549a311f60
_VERSION = "19.0"
releasegloballock = function: 0x02549a31d0b0
readdir = function: 0x02549a3163c8
createdir = function: 0x02549a316428
removedir = function: 0x02549a31c348
crash = function: 0x02549a31c3b0
allocconsole = function: 0x02549a31c410
suspend = function: 0x02549a31c478
noise = function: 0x02549a31c4d8
pinghosts = function: 0x02549a31c538
この中で重要なのはDaVinci ResolveでUIを管理するUIDispatcherです.これを使ってツールを作ります.
OpenTimeline
それでは1つ目のツールを作ります.これはプロジェクトにあるタイムラインをすべて列挙して表示し、選択することでそのタイムラインを開くものです. ここからはスクリプトファイルを作成する必要があります.スクリプトファイルの場所はコンソールから以下のスクリプトで開くことができます.
bmd.openfileexternal("Open", fusion:MapPath("Scripts:"))
openfileexternalは外部アプリケーションで開く関数です.
私の場合、C:\Users\<user>\AppData\Roaming\Blackmagic Design\DaVinci Resolve\Support\Fusionのフォルダが開きます.
その中の Compフォルダに OpenTimeline.lua ファイルを作成します.
とくに決まりはありませんが、ここではmain関数を作ります.
function main()
  print("Hello World!")
end

main()
この状態で、DaVinci Resolveのメニューから「Workspace > Scripts > Comp > OpenTimeline」の項目があるか確認し、実行してみましょう. コンソールに "Hello World!" と表示されれば問題ありません.もし、Fusionページを開いているなら「Workspace > Scripts > OpenTimeline」となります.
具体的な処理はmain関数に書いていきます.
まずはお約束として、現在開いているプロジェクト情報にアクセスできるようにします.
function main()
  local pm = resolve:GetProjectManager()
  local cm = pm:GetCurrentProject()
  local mp = cm:GetMediaPool()
end
タイムラインはメディアプールに含まれています. メディアプールのルートフォルダを取得して、タイムラインを検索します.
function main()
  local pm = resolve:GetProjectManager()
  local cm = pm:GetCurrentProject()
  local mp = cm:GetMediaPool()

  local rootFolder = mp:GetRootFolder()
  local clips = scandir(rootFolder, rootFolder:GetName())
end
これから作成するscandirという関数はフォルダ内のクリップを取得します.
フォルダのGetSubFolderListでサブフォルダを、GetClipListでクリップを取得します.
function scandir(folder, parentName)
    local clips = {}
    print('scan... [' .. folder:GetName() .. ']')
    local subfolders = folder:GetSubFolderList()
    for i,sub in ipairs(subfolders) do
        local subclips = scandir(sub, parentName .. '/' .. sub:GetName())
        for k,v in pairs(subclips) do clips[k] = v end
    end

    local subclips = folder:GetClipList()
    for i,clip in ipairs(subclips) do
        local clipName = clip:GetClipProperty('Clip Name')
        local clipType = clip:GetClipProperty('Type')
        local path = parentName .. '/' .. clipName
        clips[path] = { Name=clipName, Type=clipType, Clip=clip }
    end

    return clips
end

function main()
  local pm = resolve:GetProjectManager()
  local cm = pm:GetCurrentProject()
  local mp = cm:GetMediaPool()

  local rootFolder = mp:GetRootFolder()
  local clips = scandir(rootFolder, rootFolder:GetName())
end
クリップを見つけたら GetClipProperty でクリップ名とクリップの種類を取得して一時テーブルに格納して、そのテーブルを返します.
クリップの列挙が終わったら、それを表示して選択できるようにしましょう.
bmdライブラリのUIDispatcherを使います.
function main()
    local pm = resolve:GetProjectManager()
    local cm = pm:GetCurrentProject()
    local mp = cm:GetMediaPool()

    local rootFolder = mp:GetRootFolder()
    local clips = scandir(rootFolder, rootFolder:GetName())

    ui = fu.UIManager
    dispatcher = bmd.UIDispatcher(ui)
    win = dispatcher:AddWindow(
        {
            ID = 'MainWin',
            WindowTitle = 'Open Timeline...',
            Geometry = { 400, 300, 800, 400 },

            ui:Tree {
                ID = "Tree",
                SortingEnabled = true,
                Events = {
                    ItemDoubleClicked = true,
                }
            },
        }
    )

    win.On.MainWin.Close(ev) = function(ev)
        dispatcher:ExitLoop()
    end

    win:Show()
    dispatcher:RunLoop()
    win:Hide()
end
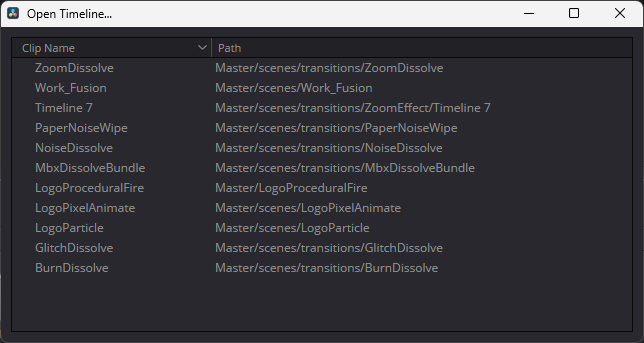
これを実行すると次のようなウィンドウが表示されます.

dispatcherの関数AddWindowでウィンドウを作成しています.
IDは固有ID、WindowTitleはウィンドウのタイトル、Geometryはウィンドウの位置と大きさです.
UI要素として、Treeを配置しています.Treeでは SortingEnabled を有効にして自動ソートさせています.
また、ItemDoubleClickedイベントを有効にすることでダブルクリックイベントを発生させるようにしています.
最後の部分は、ウィンドウが閉じられた時の処理や、ウィンドウの表示、ループ処理などを行っています.ここは定型のような部分です.
win.On.MainWin.Close(ev) = function(ev)
    dispatcher:ExitLoop()
end

win:Show()
dispatcher:RunLoop()
win:Hide()
では、このTreeに列挙したクリップを表示しましょう. まずはTreeの表示をカスタマイズします.カラムを2つにしてヘッダ��ー名を設定します.
items = win:GetItems()
hdr = items.Tree:NewItem()
hdr.Text[0] = 'Clip Name'
hdr.Text[1] = 'Path'
items.Tree:SetHeaderItem(hdr)
items.Tree.ColumnWidth[0] = 200
そして、クリップを追加します.タイムラインのみにしたいので、クリップの種類で判定します.
for k,v in pairs(clips) do
    if v.Type == "Timeline" then
        newTreeItem = items.Tree:NewItem()
        newTreeItem.Text[0] = v.Name
        newTreeItem.Text[1] = k
        items.Tree:AddTopLevelItem(newTreeItem)
    end
end
これらを組み込みましょう.
function main()
    local pm = resolve:GetProjectManager()
    local cm = pm:GetCurrentProject()
    local mp = cm:GetMediaPool()

    local rootFolder = mp:GetRootFolder()
    local clips = scandir(rootFolder, rootFolder:GetName())

    ui = fu.UIManager
    dispatcher = bmd.UIDispatcher(ui)
    win = dispatcher:AddWindow(
        {
            ID = 'MainWin',
            WindowTitle = 'Open Timeline...',
            Geometry = { 400, 300, 800, 400 },

            ui:Tree {
                ID = "Tree",
                SortingEnabled = true,
                Events = {
                    ItemDoubleClicked = true,
                }
            },
        }
    )

    items = win:GetItems()
    hdr = items.Tree:NewItem()
    hdr.Text[0] = 'Clip Name'
    hdr.Text[1] = 'Path'
    items.Tree:SetHeaderItem(hdr)
    items.Tree.ColumnWidth[0] = 200

    for k,v in pairs(clips) do
        if v.Type == "Timeline" then
            newTreeItem = items.Tree:NewItem()
            newTreeItem.Text[0] = v.Name
            newTreeItem.Text[1] = k
            items.Tree:AddTopLevelItem(newTreeItem)
        end
    end

    win.On.MainWin.Close(ev) = function(ev)
        dispatcher:ExitLoop()
    end

    win:Show()
    dispatcher:RunLoop()
    win:Hide()
end
実行すると次のようになります.
後はダブルクリックしたときの処理を入れます.そのまえに、タイムラインを開く処理(OpenTimeline関数)を追加しましょう.
function OpenTimeline(clipName)
    local count = cm:GetTimelineCount()
    for i=1,count do
        local timeline = cm:GetTimelineByIndex(i)
        if timeline:GetName() == clipName then
            cm:SetCurrentTimeline(timeline)
            break
        end
    end
end
これはクリップ名からタイムラインオブジェクトを検索して現在のタイムラインに設定します. 残りの処理を入れましょう.
win.On.Tree.ItemDoubleClicked = function(ev)
    OpenTimeline(tostring(ev.item.Text[0]))
    dispatcher:ExitLoop()
end
やっていることは単純で先ほど作成したOpenTimelineにダブルクリックしたときのクリップ名を渡して呼んでいます.
今回はダブルクリックしてタイムラインを開いたら、ウィンドウを閉じるようにしています.
ここまでのコードです.
function main()
    local pm = resolve:GetProjectManager()
    local cm = pm:GetCurrentProject()
    local mp = cm:GetMediaPool()

    local rootFolder = mp:GetRootFolder()
    local clips = scandir(rootFolder, rootFolder:GetName())

    ui = fu.UIManager
    dispatcher = bmd.UIDispatcher(ui)
    win = dispatcher:AddWindow(
        {
            ID = 'MainWin',
            WindowTitle = 'Open Timeline...',
            Geometry = { 400, 300, 800, 400 },

            ui:Tree {
                ID = "Tree",
                SortingEnabled = true,
                Events = {
                    ItemDoubleClicked = true,
                }
            },
        }
    )

    items = win:GetItems()
    hdr = items.Tree:NewItem()
    hdr.Text[0] = 'Clip Name'
    hdr.Text[1] = 'Path'
    items.Tree:SetHeaderItem(hdr)
    items.Tree.ColumnWidth[0] = 200

    for k,v in pairs(clips) do
        if v.Type == "Timeline" then
            newTreeItem = items.Tree:NewItem()
            newTreeItem.Text[0] = v.Name
            newTreeItem.Text[1] = k
            items.Tree:AddTopLevelItem(newTreeItem)
        end
    end

    function OpenTimeline(clipName)
        local count = cm:GetTimelineCount()
        for i=1,count do
            local timeline = cm:GetTimelineByIndex(i)
            if timeline:GetName() == clipName then
                cm:SetCurrentTimeline(timeline)
                break
            end
        end
    end

    win.On.Tree.ItemDoubleClicked = function(ev)
        OpenTimeline(tostring(ev.item.Text[0]))
        dispatcher:ExitLoop()
    end

    win.On.MainWin.Close = function(ev)
        dispatcher:ExitLoop()
    end

    win:Show()
    dispatcher:RunLoop()
    win:Hide()
end
これでタイムラインを開くツールはできたのですが、もう少し使いやすくしましょう. 検索機能を入れます.具体的な詳細は省きますが、検索用のUIを追加し、入力された文字が更新されるたびにフィルターをかけるようにします. また、検索入力のところでEnterキーを押したら、Treeの一番上に表示されているタイムラインを開くようにもしています.
最終的なコードは次のようになります.
function scandir(folder, parentName)
    local clips = {}
    print('scan... [' .. folder:GetName() .. ']')
    local subfolders = folder:GetSubFolderList()
    for i,sub in ipairs(subfolders) do
        local subclips = scandir(sub, parentName .. '/' .. sub:GetName())
        for k,v in pairs(subclips) do clips[k] = v end
    end

    local subclips = folder:GetClipList()
    for i,clip in ipairs(subclips) do
        local clipName = clip:GetClipProperty('Clip Name')
        local clipType = clip:GetClipProperty('Type')
        local path = parentName .. '/' .. clipName
        clips[path] = { Name=clipName, Type=clipType, Clip=clip }
    end

    return clips
end

function main()
    local pm = resolve:GetProjectManager()
    local cm = pm:GetCurrentProject()
    local mp = cm:GetMediaPool()

    local rootFolder = mp:GetRootFolder()
    local clips = scandir(rootFolder, rootFolder:GetName())

    ui = fu.UIManager
    dispatcher = bmd.UIDispatcher(ui)
    win = dispatcher:AddWindow(
        {
            ID = 'MainWin',
            WindowTitle = 'Open Timeline...',
            Geometry = { 400, 300, 800, 400 },

            ui:VGroup
            {
                ui:HGroup {
                    Weight = 0,

                    ui:Label({Text = 'Search: ', Weight = 0 }),
                    ui:LineEdit {
                        ID = "SearchText",
                        Text = "",
                        PlaceholderText = "Search Text...",
                        ClearButtonEnabled = true,
                        Events = {
                            TextChanged = true,
                            ReturnPressed = true
                        }
                    },
                },
                ui:HGroup {
                    ui:Tree {
                        ID = "Tree",
                        SortingEnabled = true,
                        Events = {
                            ItemDoubleClicked = true,
                        }
                    },
                }
            }
        }
    )

    items = win:GetItems()
    hdr = items.Tree:NewItem()
    hdr.Text[0] = 'Clip Name'
    hdr.Text[1] = 'Path'
    items.Tree:SetHeaderItem(hdr)
    items.Tree.ColumnWidth[0] = 200

    for k,v in pairs(clips) do
        if v.Type == "Timeline" then
            newTreeItem = items.Tree:NewItem()
            newTreeItem.Text[0] = v.Name
            newTreeItem.Text[1] = k
            items.Tree:AddTopLevelItem(newTreeItem)
        end
    end

    function OpenTimeline(clipName)
        local count = cm:GetTimelineCount()
        for i=1,count do
            local timeline = cm:GetTimelineByIndex(i)
            if timeline:GetName() == clipName then
                cm:SetCurrentTimeline(timeline)
                break
            end
        end
    end

    win.On.SearchText.TextChanged = function(ev)
        items.Tree:Clear()
        local searchText = ev.Text:lower()
        for k,v in pairs(clips) do
            if v.Type == "Timeline" and v.Name:lower():find(searchText) then
                newTreeItem = items.Tree:NewItem()
                newTreeItem.Text[0] = v.Name
                newTreeItem.Text[1] = k
                items.Tree:AddTopLevelItem(newTreeItem)
            end
        end
    end

    win.On.SearchText.ReturnPressed = function(ev)
        local currentItem = items.Tree:ItemAt(0)
        if currentItem then
            OpenTimeline(tostring(currentItem.Text[0]))
            dispatcher:ExitLoop()
        end
    end

    win.On.Tree.ItemDoubleClicked = function(ev)
        OpenTimeline(tostring(ev.item.Text[0]))
        dispatcher:ExitLoop()
    end

    win.On.MainWin.Close = function(ev)
        dispatcher:ExitLoop()
    end

    win:Show()
    dispatcher:RunLoop()
    win:Hide()
end

main()
実行すると次のようになります.

これで完成です.
Fusionで特定のノードのボタンを押す
2つ目のツールです.
まず、現在開いているFusionのノードは GetToolListで列挙できます.compは現在のコンポジションオブジェクトです.
tools = comp:GetToolList(false)
選択したノードだけ列挙したい場合は、次のようになります.
tools = comp:GetToolList(true)
特定のノードを絞り込みたい場合は、すべてのノードを列挙して走査するか、ノードタイプがわかっているならば、GetToolListの引数に渡すことができます.
たとえば、Trailsノードのみ列挙したい場合は次のようになります
tools = comp:GetToolList(false, "Trails")
Fusion上で各ノードの種類を確認したい場合、Ctrl+Shift+Eキーで確認できます.
次に、各ノードのパラメータを設定・取得する方法ですが、パラメータ名がキーとなっています. たとえば、すべてのTrailsノードのRotateを変更したい場合、次のようになります.
tools = comp:GetToolList(false, "Trails")
for i,v in ipairs(tools) do
    v.Rotate = 30
end
アニメーションさせたい場合や、特定のフレームに設定したい場合については割愛します. では、パラメータ名を調べるにはどうすればいいかというと、インスペクタで確認したいパラメータのところにカーソルを合わせると、ステータスバーに表示されます.

では、本題に入ります.ボタンはどうなのかというと、たとえば Trails の Restart にカーソルを合わせると Trails1.Restart のように表示されます.
実は、この Restart に 1 を代入するとボタンを押したことになります.
試してみましょう.Trailsノードではわかりづらいので、ここでは pEmitterノードを作成して使います.このノードには Reseed ボタンがあって、押すと Random Seedの値が変わります.
次のスクリプトを実行してみます.
tools = comp:GetToolList(false, "pEmitter")
for i,v in ipairs(tools) do
    v.Randomize = 1
end
Reseed ではなく、Randomize であることに注意しましょう.パラメータ名は必ずしもUIで表示されている名前と同じというわけではありません.
このスクリプトを実行するたびに、Random Seedの値が変わっていれば問題ありません.
あとは、同様にTrailsノードのボタンを押す処理を作るだけです.とてもシンプルです.
tools = comp:GetToolList(false, "Trails")
for i,v in ipairs(tools) do
    v.Restart = 1
    v.Preroll = 1
end
以上です.スクリプトを使えば、生産性が劇的に上がるので、少しでも参考になれば幸いです.